
A transaction processing application makes a series of database updates. GT.M executes these updates online or from data-driven logic, commonly called "batch."
Online Update: An online update arrives at GT.M as a message from a client.
Driven by internal information, such as balances in end-of-day, or external information, such as a list of checks from a clearinghouse.
The processing model in each case is a transaction or a unit of work initiated by client input such as a request to transfer funds from one account to another, or as the next logical unit of work such as posting interest on the next account. This general model holds both for applications where users login directly to a host (perhaps using terminal emulation from a workstation) and those where a client communicates with a host server process. This section lists key considerations for a transaction processing application to:
reliably perform online and batch updates on GT.M
implement an LMS configuration in a tiered environment, and
facilitate recovery in a cutover event.
FIS recommends you to plan upfront for database consistency while designing the architecture of an LMS application. Some of the planning parameters for application's architecture may include:
Always package all database updates into transactions that are consistent at the level of the application logic using the TSTART and TCOMMIT commands. For information on commands, refer to the "Commands" chapter in the GT.M Programmer's Guide. For any updates not so packaged, ensure that the database is logically consistent at the end of every M statement that updates the database; or that there is application logic to check, and restore application-level consistency when the database recovers after a crash.
Ensure that internally driven batch operations store enough information in the database to enable an interrupted batch operation to resume from the last committed transaction. In case an originating instance fails in the middle of a batch process, a new originating instance (previously a replicating instance) typically must resume and complete the batch process.
If the application cannot or does not have the ability to restart batch processes from information in the database, copy a snapshot of the database to a replicating instance just before the batch starts. In case an originating instance fails, restore the new originating instance to the beginning of the batch operations, and restart the batch operation from the beginning on the new originating instance.
Ensure that externally driven batch processing also has the ability to resume. The external file driving the batch operation must be available on the replicating instance before starting the batch operation on the originating instance. This is required to handle originating instance failure during the batch process.
GT.M produces an error for updates outside the set of database files defined by the instance file. External references are not prohibited as such. In other words, there can be global directory and instance configurations where an external reference update falls within the instance and works correctly. Read references outside an instance are permitted because they currently do not engage replication.
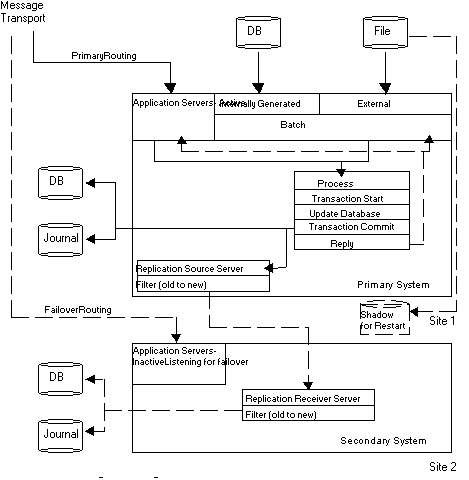
This diagram illustrates an application architecture that can reliably perform batch and online updates in a tiered environment. It addresses the online updates via the Message Transport (which has to be able to reroute communications to the current originating instance after a cutover) and batch updates via an external file (which has to be made available to the current originating instance after a cutover).
An application server is a GT.M process that accepts, processes, and responds to messages provided through the Message Transport. They may exist as a bunch of application servers in a “cloud” of size determined by the size of the node and the needs of the application. On the originating instance, an application server process receives messages and processes application transactions. The application logic issues the TSTART command and a series of SET (also KILL and MERGE) commands that [potentially/provisionally] update the database, then a TCOMMIT command to finalize the transaction. The process may directly WRITE a reply, but another process may act as an agent that takes that reply from a database record and sends it to the originator.
This section describes how a well-designed messaging system makes an application's architecture more cutover-ready by using an example in which the originating instance fails after the TCOMMIT, but before the system generates a reply and transmits it to the client.
As noted in the previous section, application servers on the originating instance respond to messages from clients delivered over a network for online operations in a tiered environment. Each client message results in zero (inquiry) or one update transaction on the server. The network delivering messages must be robust. This means each message must either be delivered exactly once to an application server on the originating instance, or result in client notification of the delivery failure. The messaging system must handle situations such as failure on the originating instance after the client transmits the message but before the originating instance receives it. Integration of the message delivery system with the logic determining whether an instance is an originating instance or replicating instance at any time reduces risk and switch over time.
Application logic typically responds to client messages with a reply generated immediately after the TCOMMIT for a transaction. The application and the message architecture must handle the scenario in which the originating system fails after the TCOMMIT, but before the system generates a reply and transmits it to the client. In such a scenario, the client waits for a response and eventually timesout and retries the message.
An LMS application can handle this situation by designing the message structure to have a unique message identifier (MSGID), and the application to include the MSGID in the database as part of the TCOMMIT.
If the originating instance crashes after committing the transaction and the cutover logic makes the former replicating instance the new originating instance--This new originating instance, then, receives the retried message that has the same MSGID from the client. In this case, one of the following can occur:
The database shows that the transaction corresponding to the MSGID in the message was processed. The server could then reply that this transaction was processed. A more sophisticated approach computes the response to the client within the transaction, and to stores it in the database as part of the transaction commit. Upon receipt of a message identified as a retry of a previously processed message, the server returns the stored response from the database to the client.
The database shows the transaction as unprocessed. In this case, the new originating instance processes the transaction. At this time, it is unknown whether the former originating instance processed the transaction before going down. If it was not processed, there is no issue. If it was processed but not replicated, GT.M rollback logic rolls it back when the former originating instance comes up as a replicating instance, and it must be reconciled either manually or automatically, from the rollback report (since the result of processing the first time may be different from the result of processing the second time).
This section describes the system requirements that are necessary to implement an application with an LMS configuration.
GT.M does not make any decisions regarding originating or replicating operations of an instance. You must explicitly specify –ROOTPRIMARY to identify an instance as current originating instance during application startup.
To implement a robust, continuously available application, each application instance must come up in the correct state. In particular, there must be exactly one originating instance (-ROOTPRIMARY) at any given time. All database update operations on replicated databases must take place on the originating instance. LMS prohibits independent logical database updates on instances other than the originating instance.
![[Note]](../common/images/note.jpg) | Note |
|---|---|
MUPIP BACKUP -ONLINE and MUPIP REORG -ONLINE update control information or physical representations, not the logical database contents, and can operate freely on a replicating instance. |
Cutover is the process of reconfiguring an LMS application so that a replicating instance takes over as the current originating instance. This might be a planned activity, such as bringing down the originating instance for hardware maintenance, or it may be unplanned such as maintaining application availability when the originating instance or the network to the originating instance goes down.
Implementing and managing cutover is outside the scope of GT.M. FIS recommends you to adhere to the following rules while designing cutover:
Always ensure that there is only one originating instance at any given time where all database updates occur. If there is no originating instance, the LMS application is also not available.
Ensure that messages received from clients during a cutover are either rejected, so the clients timeout and retry, or are buffered and sent to the new originating instance.
Always configure a former originating instance to operate as a replicating instance whenever it resumes operations or comes back online after a crash.
Failing to follow these rules may result in the loss of database consistency between an originating instance and its replicating instances.
![[Important]](../common/images/important.jpg) | Important |
|---|---|
A cutover is a wholesome practice for maximizing business continuity. FIS strongly recommends setting up a cutover mechanism to keep a GT.M application up in the face of disruptions that arise due to errors in the underlying platform. In environments where a cutover is not a feasible due to operational constraints, consider setting up an Instance Freeze mechanism for your application. For more information, refer to “Instance Freeze”. |
In the event of run-time conditions such as no disk space, I/O problems, or disk structure damage, some operational policies favor deferring maintenance to a convenient time as long as it does not jeopardize the functioning of the GT.M application. For example, if the journal file system runs out of disk space, GT.M continues operations with journaling turned off and moves to the replication WAS_ON state until journaling is restored. If there is a problem with one database file or journal file, processes that update other database regions continue normal operation.
Some operational policies prefer stopping the GT.M application in such events to promptly perform maintenance. For such environments, GT.M has a mechanism called "Instance Freeze".
The Instance Freeze mechanism provides an option to stop all updates on the region(s) of an instance as soon as a process encounters an error while writing to a journal or database file. This mechanism safeguards application data from a possible system crash after such an error.
The environment variable gtm_custom_errors specifies the complete path to the file that contains a list of errors that should automatically stop all updates on the region(s) of an instance. The error list comprises of error mnemonics (one per line and in capital letters) from the GT.M Message and Recovery Guide. The GT.M distribution kits include a custom_errors_sample.txt file which can be used as a target for the gtm_ custom_errors environment variable.
| Note |
|---|---|
When a processes that is part of an instance configured for instance freeze behavior encounters an error with journaling, it freezes the instance and invokes its own error trap even if it does not have the gtm_custom_errors environment variable set. |
You can enable the Instance Freeze mechanism selectively on any region(s) of an instance. For example, a region that represents a patient or financial record may qualify for an Instance Freeze whereas a region with an easily rebuilt cross reference index may not. You can also promptly freeze an instance irrespective of whether any region is enabled for Instance Freeze.
MUPIP SET -[NO]INST[_FREEZE_ON_ERROR] [-REGION|-FILE] enables custom errors in region to automatically cause an Instance Freeze. MUPIP REPLICATE -SOURCE -FREEZE={ON|OFF} -[NO]COMMENT[='"string"'] promptly sets or clears an Instance Freeze on an instance irrespective of whether any region is enabled for Instance Freeze (with MUPIP SET -INST_FREEZE_ON_ERROR).
A process that is not in a replicated environment ignores $gtm_custom_errors. The errors in the custom errors file must have a context in one of the replicated regions and the process recognizing the error must have the replication Journal Pool open. For example, an error like UNDEF cannot cause an Instance Freeze because it is not related to the instance. It also means that, for example, standalone MUPIP operations can neither cause nor honor an Instance Freeze because they do not have access to the replication Journal Pool. A process with access to the replication Journal Pool must honor an Instance Freeze even if does not have a custom error file and therefore cannot initiate an Instance Freeze.
Depending on the error, removing an Instance Freeze is operator driven or automatic. GT.M automatically removes Instance Freezes that are placed because of no disk space; for all other errors, Instance Freeze must be cleared manually by operator intervention. For example, GT.M automatically places an Instance Freeze when it detects a DSKNOSPCAVAIL message in the operator log. It automatically clears the Instance Freeze when an operator intervention clears the no disk space condition. During an Instance Freeze, GT.M modifies the NOSPACEEXT message from error (-E-) to warning (-W-) to indicate it is performing the extension even though the available space is less than the specified extension amount. The following errors are listed in the custom_errors_sample.txt file. Note that GT.M automatically clears the Instance Freeze set with DSKNOSPCAVAIL when disk space becomes available. All other errors require operator intervention.
Errors associated with database files caused by either I/O problems or suspected structural damage: DBBMLCORRUPT, DBDANGER, DBFSYNCERR, DSKNOSPCAVAIL, GBLOFLOW, GVDATAFAIL, GVDATAGETFAIL, GVGETFAIL, GVINCRFAIL, GVKILLFAIL, GVORDERFAIL, GVPUTFAIL, GVQUERYFAIL, GVQUERYGETFAIL, GVZTRIGFAIL, OUTOFSPACE, TRIGDEFBAD.
Errors associated with journal files caused by either I/O problems or suspected structural damage: JNLACCESS, JNLCLOSE, JNLCLOSED, JNLEXTEND, JNLFILECLOSERR, JNLFILEXTERR, JNLFILOPN, JNLFLUSH, JNLFSYNCERR, JRTNULLFAIL, JNLRDERR, JNLREAD, JNLVSIZE, JNLWRERR.
During an Instance Freeze, attempts to update the database and journal files hang but operations like journal file extract which do not require updating the database file(s) continue normally. When an Instance Freeze is cleared, processes automatically continue with no auxiliary operational or programmatic intervention. The Instance Freeze mechanism records both the freeze and the unfreeze in the operator log.
| Note |
|---|---|
As of V6.0-000, the Instance Freeze facility is a field test grade implementation. Because there are a large number of errors that GT.M can recognize and because GT.M has several operational states, the GT.M team has tested the errors in the custom_errors_sample.txt which are consistent with what we expect to be common usage. If you experience problems trying to add other errors or have concerns about plans to add other errors, please consult your GT.M support channel. |
GT.M includes a plugin reference implementation that provides the functionality to secure the replication connection between instances using Transport Layer Security (TLS; previously known as SSL). Just as database encryption helps protect against unauthorized access to a database by an unauthorized process that is able to access disk files (data at rest), the plugin reference implementation secures the replication connection between instances and helps prevent unauthorized access to data in transit. FIS has tested GT.M's replication operations of the TLS plugin reference implementation using OpenSSL (http://www.openssl.org). A future GT.M release may include support for popular and widely available TLS implementations / cryptography packages other than OpenSSL. Note that a plug-in architecture allows you to choose a TLS implementation and a cryptography package. FIS neither recommends nor supports any specific TLS implementation or cryptography package and you should ensure that you have confidence in and support for whichever package that you intend to use in production.
| Note |
|---|---|
Database encryption and TLS/SSL replication are just two of many components of a comprehensive security plan. The use of database encryption and TLS replication should follow from a good security plan. This section discusses encrypted GT.M replicating instances and securing the replication connection between them using TLS/SSL; it does not discuss security plans. |
| Important |
|---|---|
You can setup TLS replication between instances without using GT.M Database Encryption. GT.M Database Encryption is not a prerequisite to using TLS replication. |
The general procedure of creating a TLS replication setup includes the following tasks:
Create a new database or use an existing one.
Enabling replication and starting the Source and Receiver Servers with the TLSID qualifier.
To use TLS, the communicating parties need to authenticate each other. If the authentication succeeds, the parties encrypt the subsequent communication. TLS authentication uses certificates signed by Certificate Authorities (CAs). Certificate Authorities' certificates themselves are signed (and trusted) by other CAs eventually leading to a Root CA, which self-signs. its own certificate Although the topic of certificates, and the use of software such as OpenSSL is well beyond the scope of GT.M documentation, the steps below illustrate the quick-start creation of a test environment using Source and Receiver certifications with a self-signed Root CA certificate.
Creating a root certificate authority involves three steps.
Generate a private key with the OpenSSL command:
openssl genrsa -des3 -out ca.key 4096. The command prompts for a password with which to protect the private key.Generate a self-signed certificate with the OpenSSL command:
openssl req -new -x509 -days 365 -key ca.key -out ca.crt. The command first prompts for the password of the private key followed by a series of interactive queries regarding the attributes of the certificate. Below is sample output:Enter pass phrase for ca.key: You are about to be asked to enter information that will be incorporated into your certificate request. What you are about to enter is what is called a Distinguished Name or a DN. There are quite a few fields but you can leave some blank For some fields there will be a default value, If you enter '.', the field will be left blank.
-----Country Name (2 letter code) [AU]:US State or Province Name (full name) [Some-State]:PA Locality Name (eg, city) []:Malvern Organization Name (eg, company) [Internet Widgits Pty Ltd]:Example Pvt. Ltd Organizational Unit Name (eg, section) []:Certificate Authority Common Name (e.g. server FQDN or YOUR name) []:www.example.com Email Address []:example@example.com
At this point, ca.crt is a root certificate that can be used to sign other certificates (including intermediate certificate authorities). The private key of the root certificate must be protected from unauthorized access.
The root certificate is used to sign regular, leaf-level certificates. Below are steps showing the creation of a certificate to be used to authenticate a GT.M Source Server with a GT.M Receiver Server (and vice-versa).
Generate a private key. This is identical to step (a) of root certificate generation.
Generate a certificate sign request with the OpenSSL command
openssl req -new -key client.key -out client.csr. The command first prompts for the password of the private key followed by a series of interactive queries regarding the attributes of the certificate. Below is sample output:Enter pass phrase for client.key: You are about to be asked to enter information that will be incorporated into your certificate request. What you are about to enter is what is called a Distinguished Name or a DN. There are quite a few fields but you can leave some blank For some fields there will be a default value, If you enter '.', the field will be left blank.
-----Country Name (2 letter code) [AU]:US State or Province Name (full name) [Some-State]:PA Locality Name (eg, city) []:Malvern Organization Name (eg, company) [Internet Widgits Pty Ltd]:XYZQ International Organizational Unit Name (eg, section) []: OurSourceServer Common Name (e.g. server FQDN or YOUR name) []:www.xyzq.com Email Address []:xyzq@xyzq.com Please enter the following 'extra' attributes to be sent with your certificate request A challenge password []:challenge An optional company name []:XYZQ Pvt. Ltd
Typically, organization that generates the certificate sign then sends it to a certificate authority (or a root certificate authority), which audits the request and signs the certificate with its private key, thereby establishing that the certificate authority trusts the company/organization that generated the certificate and requested its signing. In this example, we sign the certificate sign request with the root certificate generated above.
Sign the certificate sign request with an OpenSSL command like:
openssl ca -config $PWD/openssl.cnf -in client.ccr -out client.crt
The output of this command looks like the following:
>You are about to be asked to enter information that will be incorporated
into your certificate request.
What you are about to enter is what is called a Distinguished Name or a DN.
There are quite a few fields but you can leave some blank
For some fields there will be a default value,
If you enter '.', the field will be left blank.
Country Name (2 letter code) [US]: US
State or Province Name (full name) [Philadelphia]:Illinois
City (e.g., Malvern) [Malvern]:Chicago"
Organization Name (eg, company) [FIS]:FIS
Organizational Unit Name (eg, section) [GT.M]:GT.M
Common Name (e.g. server FQDN or YOUR name) [localhost]:fisglobal.com
Ename Address (e.g. helen@gt.m) []:root@gt.m

Please enter the following 'extra' attributes
to be sent with your certificate request
A challenge password []:
An optional company name []:
Using configuration from /usr/lib/ssl/openssl.cnf
Enter pass phrase for ./certs/ca.key:
Check that the request matches the signature
Signature ok
Certificate Details:
 Serial Number: 14 (0xe)
 Validity
 Not Before: Jun 11 14:06:53 2014 GMT
 Not After : Jun 12 14:06:53 2014 GMT
 Subject:
 countryName = US
 stateOrProvinceName = Illinois
 organizationName = FIS
 organizationalUnitName = GT.M
 commonName = fisglobal.com
 emailAddress = helen@gt.m
 X509v3 extensions:
 X509v3 Basic Constraints:
 CA:FALSE
 Netscape Comment:
 OpenSSL Generated Certificate
 X509v3 Subject Key Identifier:
 96:FD:43:0D:0A:C1:AA:6A:BB:F3:F4:02:D6:1F:0A:49:48:F4:68:52
 X509v3 Authority Key Identifier:
 keyid:DA:78:3F:28:8F:BC:51:78:0C:5F:27:30:6C:C5:FE:B3:65:65:85:C9

Certificate is to be certified until Jun 12 14:06:53 2014 GMT (1 days)
Sign the certificate? [y/n]:y


1 out of 1 certificate requests certified, commit? [y/n]y
Write out database with 1 new entries
Data Base Updated
| Important |
|---|---|
Keep the self-signed root certificate authority and leaf-level certificates in a secure location. Protect their directories with 0500 permissions and the individual files with 0400 permissions so that unauthorized users cannot access them. |
Please refer to OpenSSL documentation http://www.openssl.org/docs/ for information on how to create intermediate CAs, Diffie-Hellman parameters, Certificate Revocation Lists, and so on.
The configuration file is divided into two sections–Database encryption section and the TLS section. The database encryption section contains the list of database files and their corresponding key files and the TLS section contains a TLSID label that identifies the location of root certification authority certificate in PEM format and leaf-level certificate with their corresponding private key files. Note that the use of the gtmcrypt_config environment variable require the libconfig library to be installed.
After creating a leaf-level certificate that is signed by a self-signed root certificate, create a configuration file (one for Source and the other for Receiver Server) with the following format:
tls: {
     verify-depth: 7;
     CAfile: "/path/to/ca.crt";
     tls : {
           format: "PEM";
           cert: "/path/to/client.crt";
           key: "/path/to/client.key";
     };
};
where tls specifies the TLSID that is used to start the Source/Receiver Server, CAfile specifies the path to the root certification authority, cert specifies the the path to leaf-level certificate and key specifies the path to the private key file.
Set the gtmcrypt_config environment variable to point to the path to the configuration file. The environment variable gtmtls_passwd_<tlsid> must specify an obfuscated version of the password for the client's private key. Use the maskpass utility provided with your GT.M distribution to create an obfuscated password.
Here is a sample configuration file:
/* Database encryption section */

database: {
      keys: (
            {
                  dat: "/tmp/mumps.dat";  /* Encrypted database file. */
                  key: "/tmp/mumps.key";  /* Encrypted symmetric key. */
            },
            {
                  dat: "/tmp/a.dat";
                  key: "/tmp/a.key";
            },
            ...
      );
}

/* TLS section */

tls: {
      /* Certificate Authority (CA) verify depth provides an upper limit on the number of CAs to look up for verifying a given
       * certificate. The depth count is described as ''level 0:peer certificate'', ''level 1: CA certificate'',
       * ''level 2: higher level CA certificate'', and so on. The default verification depth is 9.
       */
      verify-depth: 7;

      /* CAfile: points to a file, in PEM format, describing the trusted CAs. The file can contain several CA certificates identified by:
       * -----BEGIN CERTIFICATE-----
       * ... (CA certificate in base64 encoding) ...
       * -----END CERTIFICATE-----
       * sequences.
       */
      CAfile: "/home/jdoe/current/tls/certs/CA/gtmCA.crt";

      /* CApath: points to a directory containing CA certificates in PEM format. The files each contain one CA certificate. The files are
       * looked up by the CA subject name hash value, which must hence be available. If more than once certificate with the same
       * name hash value exists, the extension must be different (e.g. 9d66eef0.0, 9d66eef0.1 etc). The directory is typically
       * created by the OpenSSL tool 'c_rehash'.
       */
      CApath: "/home/jdoe/current/tls/certs/CA/";

      /* Diffie-Hellman parameters used for key-exchange. Either none or both have to be specified. If neither is specified, then
       * then the data is encrypted with the same keys that are used for authentication.
       */
      dh512: "/home/jdoe/current/tls/dh512.pem";
      dh1024: "/home/jdoe/current/tls/dh1024.pem";

      /* crl: points to a file containing list of revoked certificates. This file is created by the openssl utility. */
      crl: "/home/jdoe/current/tls/revocation.crl";

      /* Timeout (in seconds) for a given session. If a connection disconnects and resumes within this time interval, the session
       * is reused to speed up the TLS handshake. A value of 0 forces sessions to not be reused. The default value is 1 hour.
       */
      session-timeout: 600;

      /* List of certificate/key pairs specified by identifiers. */
      PRODUCTION: {
            /* Format of the certificate and private key pair. Currently, the GT.M TLS plug-in only supports PEM format. */
            format: "PEM";
            /* Path to the certificate. */
            cert: "/home/jdoe/current/tls/certs/Malvern.crt";
            /* Path to the private key. If the private key is protected by a passphrase, an obfuscated version of the password
             * should be specified in the environment variable which takes the form gtmtls_passwd_<identifier>. For instance,
             * for the below key, the environment variable should be 'gtmtls_passwd_PRODUCTION'.
             * Currently, the GT.M TLS plug-in only supports RSA private keys.
             */
            key: "/home/jdoe/current/tls/certs/Malvern.key";
      };

      DEVELOPMENT: {
            format: "PEM";
            cert: "/home/jdoe/current/tls/certs/BrynMawr.crt";
            key: "/home/jdoe/current/tls/certs/BrynMawr.key";
      };
};
If you are using the environment variable gtm_dbkeys to point to the master key file for database encryption, please convert that file to the libconfig configuration file format as pointed to by the $gtmcrypt_config environment variable at your earliest convenience. Effective V6.1-000, the gtm_dbkeys environment variable and the master key file it points to are deprecated in favor of the gtmencrypt_config environment variable. Although V6.1-000 supports the use of $gtm_dbkeys for database encryption, FIS plans to discontinue support for it in the very near future. To convert master key files to libconfig format configuration files, please click on  to download the CONVDBKEYS.m program and follow instructions in the comments near the top of the program file. You can also download CONVDBKEYS.m from http://tinco.pair.com/bhaskar/gtm/doc/articles/downloadables/CONVDBKEYS.m.
GT.M replication requires a durable network link between all instances. The database replication servers must be able to use the network link via simple TCP/IP connections. The underlying transport may enhance message delivery, (for example, provide guaranteed delivery, automatic cutover and recovery, and message splitting and re-assembly capabilities); however, these features are transparent to the replication servers, which simply depend on message delivery and message receipt.
Between BEFORE_IMAGE journaling and NOBEFORE_IMAGE journaling, there is no difference in the final state of a database / instance recovered after a crash. The difference between before image and nobefore journaling is in:
the sequence of steps to recover an instance and the time required to perform them.
the associated storage costs and IO bandwidth requirements.
When an instance goes down, its recovery consists of (at least) two steps: recovery of the instance itself: hardware, OS, file systems, and so on - say tsys; tsys is almost completely[4] independent of the type of GT.M journaling.
For database recovery:
With BEFORE_IMAGE journaling, the time is simply that is needed to execute a mupip journal recover backward "*" command or, when using replication, mupip journal recover -rollback. This uses before image records in the journal files to roll the database files back to their last epochs, and then forward to the most current updates. If this takes tbck, the total recovery time is tsys+tbck.
With NOBEFORE_IMAGE journaling, the time is that required to restore the last backup, say, trest plus the time to perform a mupip journal -recover -forward "*" command, say tfwd, for a total recovery time of tsys+trest+tfwd. If the last backup is available online, so that "restoring the backup" is nothing more than setting the value of an environment variable, trest=0 and the recovery time is tsys+tfwd.
Because tbck is less than tfwd, tsys+tbck is less than tsys+tfwd. In very round numbers, tsys may be minutes to tens of minutes, tfwd may be tens of minutes and tbck may be in tens of seconds to minutes. So, recovering the instance A might (to a crude first approximation) be a half order of magnitude faster with BEFORE_IMAGE journaling than with NOBEFORE_IMAGE journaling. Consider two deployment configurations.
Where A is the sole production instance of an application, halving or quartering the recovery time of the instance is significant, because when the instance is down, the enterprise is not in business. The difference between a ten minute recovery time and a thirty minute recovery time is important. Thus, when running a sole production instance or a sole production instance backed up by an underpowered or not easily accessed, "disaster recovery site," before image journaling with backward recovery is the preferred configuration ofis the preferred configuration ofbetter suits a production deployment. Furthermore, in this situation, there is pressure to bring A back up soon, because the enterprise is not in business - pressure that increases the probability of human error.
With two equally functional and accessible instances, A and B, deployed in an LMS configuration at a point in time when A, running as the originating instance replicating to B, crashes, B can be switched from a replicating instance to an originating instance within seconds. An appropriately configured network can change the routing of incoming accesses from one instance to the other in seconds to tens of seconds. The enterprise is down only for the time required to ascertain that A is in fact down, and to make the decision to switch to B— perhaps a minute or two. Furthermore, B is in a "known good" state, therefore, a strategy of "if in doubt, switchover" is entirely appropriate. This time, tswch, is independent of whether A and B are running BEFORE_IMAGE journaling or NOBEFORE_IMAGE journaling. The difference between BEFORE IMAGE journaling and NOBEFORE_IMAGE journaling is the difference in time taken subsequently to recover A, so that it can be brought up as a replicating instance to B. If NOBEFORE_IMAGE journaling is used and the last backup is online, there is no need to first perform a forward recovery on A using its journal files. Once A has rebooted:
Extract the unreplicated transactions from the crashed environment
Connect the backup as a replicating instance to B and allow it to catch up.
| Note |
|---|---|
Applications that can take advantage the forthcoming LMX capability will essentially make tswch zero when used with a suitable front-end network. |
Cost | The cost of using an LMS configuration is at least one extra instance plus network bandwidth for replication. There are trade-offs: with two instances, it may be appropriate to use less expensive servers and storage without materially compromising enterprise application availability. In fact, since GT.M allows replication to as many as sixteen instances, it is not unreasonable to use commodity hardware[a] and still save total cost. |
Storage | Each extra instance of course requires its own storage for databases and journal files. Nobefore journal files are smaller than the journal files produced by before image journaling, with the savings potentially offset if a decision is made to retain an online copy of the last backup (whether this nets out to a saving or a cost depends on the behavior of the application and on operational requirements for journal file retention). |
Performance | IO bandwidth requirements of nobefore journaling are less than those of before image journaling, because GT.M does not write before image journal records or flush the database.
Because IO subsystems are often sized to accommodate peak IO rates, choosing NOBEFORE_IMAGE journaling may allow more economical hardware without compromising application throughput or responsiveness. |
[a] GT.M absolutely requires the underlying computer system to perform correctly at all times. So, the use of error correcting RAM, and mirrored disks is advised for production instances. But, it may well be cost effective to use servers without redundant power supplies or hot-swappable components, to use RAID rather than SAN for storage, and so on. [b] How much the steady level is lower depends on the application and workload. [c] Even flushing as many as 20,000 journal buffers, which is more than most applications use, is only 10MB of data. Furthermore, when GT.M's SYNC_IO journal flag is specified, the fsync() operation requires no physical IO. [d] The volume of dirty database blocks to be flushed can be large. For example, 80% of 40,000 4KB database blocks being dirty would require 128MB of data to be written and flushed. | |
A system crash can, and often will, damage a database file, leaving it structurally inconsistent. With before image journaling, normal MUPIP recovery/rollback repairs such damage automatically and restores the database to the logically consistent state as of the end of the last transaction committed to the database by the application. Certain benign errors may also occur (refer to the "Maintaining Database Integrity" chapter). These must be repaired on the (now) replicating instance at an appropriate time, and are not considered "damage" for the purpose of this discussion. Even without before image journaling, a replicating instance (particularly one that is multi-site) may have sufficient durability in the aggregate of its instances so that backups (or copies) from an undamaged instance can always repair a damaged instance.
| Note |
|---|---|
If the magnetic media of the database and/or the journal file is damaged (e.g., a head crash on a disk that is not mirrored), automatic repair is problematic. For this reason, it is strongly recommended that organizations use hardware mirroring for magnetic media. |
![[Caution]](../common/images/caution.jpg) | Caution |
|---|---|
Misuse of UNIX commands, such as kill-9 and ipcrm, by processes running as root can cause database damage. |
Considering the high level at which replication operates, the logical dual-site nature of GT.M database replication makes it virtually impossible for related database damage to occur on both originating and replicating instances.
To maintain application consistency, do not use DSE to repair or change the logical content of a replicated region on an originating instance.
| Note |
|---|---|
Before attempting manual database repair, FIS strongly recommends backing up the entire database (all regions). |
After repairing the database, bring up the replicating instance and backup the database with new journal files. MUPIP backup online allows replicating to continue during the backup. As stated in the Journaling chapter, the journal files prior to the backup are not useful for normal recovery.
GT.M database replication ensures that the originating instance and its replicating instances are logically identical, excluding latency in replication. During rolling upgrades, the originating instance and its replicating instances are logically equivalent but the exact storage of M global variables may differ. FIS recommends you to ensure that all database updates to replicated regions must occur only on the originating instance. GT.M replicates all changes on the originating instance to its replicating instances.
LMS applications require procedures for a number of situations, including both normal operation and failure scenarios. Although LMS applications can operate manually, the requirements are complex enough to warrant automation via scripting. It is essential to carefully design, implement, and test the procedures to provide an automatic cutover to a replicating instance within seconds. GT.M provides the required functionality to implement continuous availability via LMS; however, smooth operation requires significant system engineering to implement.
Determine current and prior instance status (originating/replicating).
Perform necessary database recovery/rollback. Different failure modes have different recovery scenarios, which may include rollback of previously committed transactions for subsequent processing. Reconcile rolled back transactions automatically or manually.
Create new journal files. Although not required, this simplifies system administration.
Bring up the Source Server on each replicating instance to establish the Journal Pool. In case of a cutover, the new originating instance needs the Journal Pool established to replicate data. On the originating instance, bring up the Source Server in active mode.
On a replicating instance, bring up the Source Server in passive mode. Start the GT.M Receiver Server on the replicating instance.
When you start an originating instance, start any application servers. Optionally start application servers on a replicating instance to facilitate a faster cutover; however, they must not perform updates to any replicating instance (Always remember the golden rule: all database updates should be performed only on the originating instance).
If you are starting a new originating instance and batch operations were in process when the former originating instance went down, restart those batch operations on the new originating instance.
An initial startup of an application instance has no prior status. There are two ways to bring up an LMS application: bring up the originating instance followed by the replicating instance, or bring both up at the same time.
Single-Site
When launching a multi-site application as a conventional single-site, versus launching it as a single-site for which a replicating instance will be launched later, always establish the Journal Pool before any M processes access the database. Bring up the Source Server in passive mode to create the Journal Pool. Then bring up the application. Later, switch the Source Server to active mode when the replicating instance comes up.
Perform database recovery/rollback to the last consistent state, since the system may previously have crashed. If the database was shut down cleanly, the recovery/rollback to the last consistent state is essentially a "no-op." This operation restores the database to the last committed transaction. (This assumes there is no media damage.)
Create new journal files.
Start the Source Server in passive mode.
Start the application servers.
If the state of the database indicates that batch operations were in process, restart batch operations.
Dual-site - Concurrent Startup
FIS does not recommend concurrent startup of instances in an LMS configuration because of the possibility of a network or timing problem resulting in multiple originating or replicating instances. However, in a dual-site configuration it is possible to concurrently startup the originating and replicating instance. The steps are as follows:
Use an external agent to identify the originating and replicating instances and then bring up both sites simultaneously.
Ensure that both databases are logically identical and have the same journal sequence number. (When starting up, an instance considers its journal sequence number to be the maximum reg_seqno of any replicated region. Thus, if the originating instance and its replicating instance do not have identical files, that is if they are logically identical but configured differently, ensure that at least one region on the replicating instance has reg_seqno and resync_seqno the same as the largest reg_seqno on the originating instance.) No rollback/recovery should be required on either site.
If there is any possibility that the two are not identical, do not bring both up concurrently.
Single-Site to Multi-Site
FIS recommends you to bring up the application as a single-site first and then bring up any replicating instances.
Setting up an A->B replication configuration for the first time
Perform the following steps to setup an originating instance Philadelphia and its replicating instance Shanghai.
On Philadelphia:
Turn on replication.
Create the replication instance file.
Start the Source Server.
On Shanghai:
Turn on replication.
Create the replication instance file.
Start the passive Source Server.
Start the Receiver Server.
| Download Example | |||||||||||||||||
|---|---|---|---|---|---|---|---|---|---|---|---|---|---|---|---|---|---|---|
msr_proc1.tar.gz contains a ready-to-run example of setting up an A->B replication configuration. Click
This example demonstrates a command sequence that can be used to set up an A->B replication configuration on a local test system. No claim of copyright is made with respect to the scripts used in this example. YOU MUST UNDERSTAND, AND APPROPRIATELY ADJUST, THIS MODULE BEFORE USING IN A PRODUCTION ENVIRONMENT. |
Setting up an A->P replication configuration for the first time
Perform the following steps to setup an originating instance Philadelphia and its supplementary instance Perth.
On Philadelphia:
Turn on replication.
Create the replication instance file.
Start the Source Server.
On Perth:
Turn on replication.
Create the replication instance file with the -supplementary qualifier.
Start the passive Source Server.
Start the Receiver Server and the Update Process with -updateresync="/path/to/bkup_orig_repl_inst_file" -initialize. Use the -updateresync -initialize qualifiers only once.
For subsequent Receiver Server and Update Process startups, perform -rollback -fetchresync start the Recevier Server and Update Process without the -updateresync -initialize qualifiers.
| Download Example | ||||||||||||||||||||||||||
|---|---|---|---|---|---|---|---|---|---|---|---|---|---|---|---|---|---|---|---|---|---|---|---|---|---|---|---|
msr_proc2.tar.gz contains a ready-to-run example of setting up an A->P replication configuration. Click
This example demonstrates a command sequence that can be used to set up an A->P replication configuration on a local test system. No claim of copyright is made with respect to the scripts used in this example. YOU MUST UNDERSTAND, AND APPROPRIATELY ADJUST, THIS MODULE BEFORE USING IN A PRODUCTION ENVIRONMENT. |
Replicating Instance Starts after a Shut Down or Crash
If the replicated regions are untouched after a shutdown or crash, simply restart the replicating instance. It automatically catches up with the originating instance. Perform the following steps to start a replicating instance after a shutdown operation or a crash:
Recover/rollback database to last consistent state.
Create new journal files.
First start the passive Source Server and then the Receiver Server.
Start the passive application servers, if appropriate.
Replicating Instance Starts from a copy of Originating Instance
In this scenario, the database used to start up a replicating instance is logically identical to the database with which the originating instance started up, and has the same journal sequence number. When the replicating instance starts, all transactions applied to the originating instance replicate to the replicating instance as it catches up with the originating instance.
Perform the following steps to start a replicating instance from a copy of the originating instance:
Load/restore the database files.
Recreate the replication instance file.
Turn replication on.
Start passive Source Server, and then the Receiver Server.
Start the passive application servers, if appropriate.
Preserve all journal files on the originating instance along with back pointers. This is because the Source Server goes to the journal file to read transactions that are no longer in the journal pool.
| Note |
|---|---|
Cease all GT.M activity in the replicating instance and RUNDOWN any open database files before copying database files onto a replicating instance, or creating new database files and loading them with extracts from the originating instance. |
Replicating Instance Starts from Backup of Originating Instance
The more common scenario for bringing up a replicating instance is to take a backup of the originating instance and bring it up as a replicating instance. If the backup is a comprehensive backup, the file headers store the journal sequence numbers.
The backup should use the -newjnlfiles switch of MUPIP backup to create new journal files. Once the replicating instance becomes operational, the Source Server does not need to go back prior to the backup to find transactions to send to the replicating instance.
Perform the following steps to start a replicating instance from the backup of an originating instance:
Load/restore the database. If the replicating database is not from a comprehensive or database backup from the originating instance, set the journal sequence number from the originating at the instant of the backup for at least one replicated region on the replicating instance.
Create new journal files without back pointers to previous generations of journal files with the -noprevjnlfile flag. Since this database represents the beginning of this instance, it is not meaningful to have a previous generation journal file.
Start the passive Source Server and then the Receiver Server with the -updateresync qualifier, along with the other startup qualifiers for the Receiver Server. As the originating instance stores the last journal sequence number transmitted to a replicating instance, this qualifier is required to force replication to start from the actual journal sequence number in the replicating instance. Without -updateresync, the Receiver Server may refuse to start replication because the journal sequence number in the replicating instance may be higher than what the originating instance expects.
Start the passive application servers, if appropriate.
Since the originating instance should not need to be rolled back to a state prior to the start of the backup, the generation link on the originating instance can be cut in the journal files created by the online backup command on the originating instance. Use MUPIP SET -jnlfile <jnl_file> -noprevjnlfile to cut the previous generation link for the journal file. Use the -bypass qualifier to override the standalone requirements of the SET command.
Under normal operation, when going from multi-site to single-site, shut down the Receiver Servers and Update Process as well as any passive Source Servers and any inactive application servers. Then perform the MUPIP RUNDOWN operation of the database.
For an extended shut down, switch the active Source Server on the originating instance to passive to prevent it from trying to connect with a replicating instance. Under normal scenarios, the originating instance operates alone, so that when a replicating instance comes back, replication resumes where it left off.
Follow these steps to perform a controlled cutover in which the originating instance and a replicating instance switch roles. Such a step is necessary to test cutover or to bring the originating instance down for maintenance. In the following steps, A is the former originating instance and new replicating instance, while B is the former replicating instance and new originating instance.
Choose a time when database update rates are low to minimize the chances clients may time out and retry their messages, and when no batch processes are running.
The external system responsible for originating/replicating status identification should be made aware that Site B should now be the originating instance and Site A should now be the replicating instance. If the messaging layer between clients and servers differs from the external control mechanism, command it to route messages to the replicating instance. There may be a need to hold messages briefly during the cutover.
On A:
Stop the application servers.
Shut down the Source Server with an appropriate timeout. The timeout should be long enough to replicate pending transactions to the replicating instance, but not too long to cause clients to conclude that the application is not available. The GT.M default Source Server wait period is up to 120 seconds.
Wait for B to become functional as the originating instance, and then query B (using -EDITINSTANCE -SHOW) for the journal sequence number when it became the originating instance, and roll back to this number. Transactions that are rolled off the originating instance become "non-replicated transactions" that must subsequently be reconciled on B, either automatically or manually.
Create new journal files.
Start the passive Source Server, and then the Receiver Server.
Start the passive application servers, if appropriate.
On B:
Shut down the Receiver Server with an appropriate timeout.
Create new journal files.
Make the passive Source Server active.
Start the application servers (if they were previously passive, make them active).
If the state of the database indicates that batch operations were in process, restart batch operations.
Begin accepting online transactions.
To shutdown an originating instance:
Shut down all GT.M and mupip processes that might be attached to the Journal Pool.
In case the originating instance is also a supplementary instance, shutdown the Receiver Server(s) (there might be more than one Receiver Server in future GT.M versions).
Shut down all active and/or passive Source Servers.
Execute mupip rundown -region to ensure that the database, Journal Pool, and Receiver Pool shared memory is rundown properly.
To shutdown a propagating instance:
Shut down all replicating instance servers (Receiver Server, Update Process and its Helper processes).
Shutdown the originating instance servers (all active and/or passive Source Servers).
On its replicating instances, ensure that there are no GT.M or MUPIP processes attached to the Journal Pool as updates are disabled (they are enabled only on the originating instance).
Execute mupip rundown -region to ensure that the database, Journal Pool, and Receiver Pool shared memory is rundown properly.
Network Failures
Perform a cutover from the originating instance to a replicating instance if the network from clients to the originating instance fails, and the network from the clients to the replicating instance is still functioning.
If the network from clients to both the originating and all available replicating instances fails, the application is no longer available.
If the network between the originating instance and replicating instance fails, no action is required to manage GT.M replication. The originating instance continues to make the application available. Replicating instances will catch up with the originating instance when the network is restored.
If the network from the clients to the replicating instance fails, no action is required to manage GT.M replication, although it would be prudent to make the network operational as soon as possible.
Single-Site Failure
Replicating Instance Fails
When the replicating instance comes back up after failure, it will still be the replicating instance. Refer to the preceding "Secondary Starts After a Shut Down or Crash" description for further details.
Originating instance Fails
If the originating instance fails, the replicating instance should take over; when the originating instance comes back up, it should come up as the new replicating instance.
The external control mechanism should detect that the originating instance has failed, and take action to switch the replicating instance to originating mode, and either route transactions to the new originating instance (former replicating instance) or notify clients to route transactions to the new originating instance.
If the former originating instance did not respond to certain transactions, one cannot be certain whether they were processed and whether or not the database updates were committed to the former replicating instance. These transactions must now be processed on the new replicating instance. When the former originating instance comes up as the new replicating instance, GT.M rolls off the processed transactions and database updates for reconciliation on the new originating instance.
On new originating instance (former replicating instance)
Stop the Replication Server.
Create new journal files.
Switch the Source Server from passive to active mode to start replicating to the new replicating instance (former originating instance) when it comes back up.
Start the application servers, or if they were passive, they should be activated. The new originating instance is now ready to receive transactions from clients.
If the state of the database indicates that batch operations were in process, restart batch operations.
When the new replicating instance (the former originating instance) comes back up, query the originating instance for the journal sequence number at which it became the originating instance (refer to “Displaying/Changing the attributes of Replication Instance File and Journal Pool” for more information), and roll back the replicating instance to this point (refer to Section : “Rolling Back the Database After System Failures” for more information). Reconcile the transaction from the lost transaction file or possibly the broken transaction file resulting from the rollback operation.
Create new journal files.
Start the Source Server in passive mode.
Start the Receiver Server to resume replication as the new replicating instance. Dual-site operation is now restored.
As appropriate, start the passive application servers.
Various dual-site failure scenarios are possible. Each case is a full system outage - that is, the application is no longer available (which is why multi-site may be attractive). This section identifies the recovery mechanism for each scenario. In each scenario, Site A is initially the originating instance and Site B is initially the replicating instance, before any failure.
Replicating Instance (Site B) Fails First
In the following scenarios, the replicating instance fails first. Once the replicating instance fails, the originating instance continues to operate. The originating instance’s replication Source Server is unable to send updates to the replicating instance. Thus, there is a queue of non-replicated transactions at the failure point on the originating instance. Then, the originating instance fails before the replicating instance recovers, which leads to a dual-site outage. Operating procedures differ according to which site recovers first.
Site A recovers first
On Site A:
Rollback the database to the last committed transaction (last application-consistent state).
Create new journal files.
Start the Source Server.
Start the application servers. Application availability is now restored.
If the state of the instance indicates that batch operations were in process, restart batch operations.
On Site B, when it recovers:
Rollback the database to the last committed transaction.
Create new journal files.
Start the Source Server in passive mode.
Start the Receiver Server. Dual-site operation is now restored.
Start the passive application servers, as appropriate.
Site B recovers first
On Site B:
Rollback the database to the last committed transaction (last application-consistent state).
Create new journal files.
Start the Source Server.
Start the application servers. Application availability is now restored.
If the state of the database indicates that batch operations were in process, restart batch operations.
On Site A, when it recovers:
Query the originating instance (refer to “Displaying/Changing the attributes of Replication Instance File and Journal Pool”) for the journal sequence number at which it became the originating instance, and roll back the replicating instance to this point. Then apply the lost transaction files to the originating instance for reconciliation/reapplication.
Create new journal files.
Start the Source Server in passive mode.
Start the Receiver Server to resume replication as the new secondary. Dual-site operation is now restored.
Start the passive application servers, as appropriate.
Originating Instance (Site A) Fails First
In the following scenarios, the originating instance fails first, causing a cutover to Site B. Site B operates as the originating instance and then fails.
Site B Recovers First
On Site B:
Roll back the database to the last committed transaction (last application-consistent state).
Create new journal files.
Start the Source Server.
Start the application servers. Application availability is now restored. If the state of the database indicates that batch operations were in process, restart batch operations.
On Site A, when it recovers:
Query the originating instance (refer to Section : “Displaying/Changing the attributes of Replication Instance File and Journal Pool” for more information) for the journal sequence number at which it became primary, and the rollback the replicating instance to this point. Then apply the lost transaction files to the originating instance for reconciliation/reapplication. The broken transaction file contains information about transactions that never completed and may be useful in researching where work should be restarted. However, broken transactions, unlike the lost transactions, are inherently incomplete.
Create new journal files.
Start the Source Server in passive mode.
Start the Receiver Server to resume replication as the new secondary. Dual-site operation is now restored.
Start the passive application servers, as appropriate.
Site A Recovers First
On Site A:
Roll back the database to the last committed transaction (last application-consistent state).
Create new journal files.
Start the Source Server.
Start the application servers. Application availability is now restored.
If the state of the database indicates that batch operations were in process, restart batch operations.
On Site B, when it recovers:
Roll back all transactions that were processed when it was the primary. Transmit the transactions backed out of the database by the rollback to the originating instance for reconciliation/reapplication.
Create new journal files.
Start the Source Server in passive mode.
Start the Receiver Server to resume replication as the new secondary. Dual-site operation is now restored.
Start the passive application servers, as appropriate.
A complex dual-site failure may result in a large number of non-replicated transactions, depending on how the instances restart. This situation occurs if both instances are down, the replicating instance comes up for a period, assumes originating instance status, and then fails again while the first originating instance remains down.
If the first originating instance comes up first after the second failure, represented as Site A in the following figure, it will be the originating instance. When Site B comes up, it will act as the replicating instance and rollback all transactions performed while it was the originating instance and Site A was down. These transactions become non-replicated transactions. If Site B came up first, then the non-replicated transactions would occur when Site A restarted. These would be the transactions while A was the originating instance after B failed.
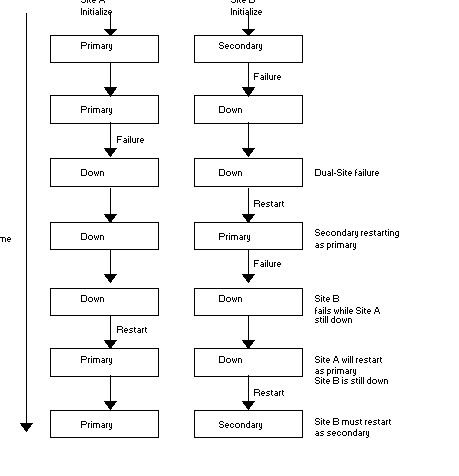
When recovering from these situations, the originating instance is always the current system of record when the replicating instance comes up. The replicating instance must roll back to the transaction with the highest journal sequence number common in both the instance and "catch up" from there. On the originating instance, reconcile all the lost and possibly broken transactions files that resulted from the rollback operation.
A rolling software upgrade provides continuous service while applying a new software release to the system. In other words, a rolling software upgrade removes the need for application downtime as while each system is updated with the new software release independently, the other system acts as the originating instance during that period.
Dual-Site Rolling Upgrade
This rolling upgrade sequence assumes that there is only one replicating instance, which is down during the upgrade. Thus, if the originating instance goes down during the upgrade, the application becomes unavailable.
| Note |
|---|---|
A properly set LMS configuration avoids this exposure. |
Assuming that Site A is the originating instance before the upgrade, here are the steps to perform a rolling upgrade:
Site A continues to operate normally, (that is, to the originating instance, a replicating instance upgrade looks like a replicating instance failure).
On Site B:
Shut down the Source and Receiver Servers and the application. Perform a MUPIP RUNDOWN operation and make a backup copy.
Upgrade the software.
If there is no change to the database layout or schema, bring the replicating instance up and proceed with the planned cutover (as follows).
Note the largest journal sequence number in any replicated database region.
Upgrade the database.
Set the journal sequence number of any replicated region to the largest journal sequence number noted above.
If there was no change to the database schema, bring the replicating instance back up and proceed with the planned cutover (as follows).
If there was a change to the database schema, bring up the replicating instance with the new-to-old filter on the Source Server, and the old-to-new filter on the Receiver Server.
At this point, dual-site operation is restored with Site B running the new software and Site A running the old software. It may be appropriate to operate in this mode for some time to verify correct operation.
After which you can execute the following to complete the upgrade:
Perform a controlled cutover between systems.
Make Site A the replicating instance and Site B the originating instance for the remainder of the upgrade.
On Site A:
Once you are satisfied with the operation of the new software on Site B, shut down the Source and Receiver Servers and the application. Run down the database and take a backup copy.
Upgrade the software.
Note the largest journal sequence number in any replicated database region.
Upgrade the database.
Set the journal sequence number of any replicated region to the largest journal sequence number noted above.
If there was no change to the database schema, bring the replicating instance back up. Normal operation is now restored, and the upgrade is complete.
If there are filters, Bring up Site A as the secondary. Use the -stopsourcefilter qualifier on the Receiver Server on Site A to turn off the filter on Site B. This restores normal operation.
Rolling SI Replication Upgrade
Although V5.5-000 supports only one source stream for SI replication, the architecture allows for fifteen externally sourced streams (numbers 1 through 15), with stream 0 being locally generated updates. Under normal conditions, on a supplementary instance, one will see updates from streams 0 and 1. If the recipient of an SI stream has been moved from receiving replication from one source to another, you may see other stream numbers (corresponding to updates from other streams) as well.
When adding SI replication, the rules to remember are that (a) both source and receiver sides of SI replication must be V5.5-000, (b) upgrading an instance to V5.5-000 requires a new replication instance file because the replication instance file format for SI is not compatible with those of prior releases and (c) the -updateresync qualifier requires the name of a prior replication instance file when both source and receiver are V5.5-000.
Remember that except where an instance is an unreplicated sole instance, you should upgrade replicating secondary instances rather than originating primary instances. Starting with BC replication (e.g., Ardmore as originating primary and BrynMawr as replicating secondary), the simplest steps to start SI replication to Malvern are:
Bring BrynMawr down and upgrade it to V5.5-000. BrynMawr requires a new replication instance file. Please refer to the relevant release notes for details of upgrading database files and global directories; unless otherwise instructed by FIS, always assume that object and journal files are specific to each GT.M release.
Resume BC replication from Ardmore to BrynMawr. Since Ardmore is at an older GT.M release than V5.5-000, when starting the Receiver Server for the first time at BrynMawr, the -updateresync qualifier does not require the name of a prior replication instance file.
Create supplementary instance Malvern from a backup of BrynMawr or Ardmore, if that is more convenient. Malvern will require a new replication instance file, created with the -supplementary qualifier.
Start SI replication from BrynMawr to Malvern. Since Malvern and BrynMawr are both V5.5-000, the -updateresync qualifier used when the Malvern Receiver Server starts for the first time requires the old replication instance file copied, perhaps as part of a BACKUP, up from BrynMawr as its value.
At your convenience, once BrynMawr is upgraded you can:
Switchover so that BrynMawr is the originating primary instance with BC replication to Ardmore and SI replication to Malvern. This is unchanged from current LMS procedures. SI replication from BrynMawr to Malvern can operate through the switchover.
Bring Ardmore down and upgrade it to V5.5-000. It requires a new replication instance file.
Start BC replication from BrynMawr to Ardmore. Since Ardmore and BrynMawr are both V5.5-000, the -updateresync qualifier for Ardmore's first Receiver Server start requires the name of a prior replication instance file. As it cannot use Ardmore's pre-V5.5-000 format replication instance file, in this special case, use a backup copy from BrynMawr as that prior file.
On the source side:
Use the MUPIP BACKUP command with the -REPLINSTANCE qualifier to backup the instance to be copied.
Ship the backed up databases and instance file to the receiving side.
On the receiving side:
Run the MUPIP REPLIC -EDITINST command on the backed up instance file to change the instance name to reflect the target instance. This makes the source replication instance file usable on the target instance while preserving the history records in the instance file.
Create new journal files, start a passive Source Server and a Receiver Server (without an -updateresync qualifier).
Allow a Source Server to connect.
To upgrade the replication instance file, perform the following steps:
Shut down all mumps, MUPIP and DSE processes except Source and Receiver Server processes; then shut down the Receiver Server (and with it, the Update Process) and all Source Server processes. Use MUPIP RUNDOWN to confirm that all database files of the instance are closed and there are no processes accessing them.
Rename the existing replication instance file after making a backup copy.
Create a new replication instance file (you need to provide the instance name and instance file name, either with command line options or in environment variables, as documented in the Administration and Operations Guide):
If this is instance is to receive SI replication (Malvern in the examples above) or to receive BC replication from an instance that receives SI replication (Newtown in the examples above), use the command:
mupip replicate -instance_create -supplementary
Otherwise use the command:
mupip replicate -instance_create
Prepare it to accept a replication stream:
Start a passive Source Server using the -updok flag.
- Start the Receiver Server using the updateresync flag, e.g.: mupip replicate -receiver -start -updateresync=filename flag where filename is the prior replication file if the source is V5.5-000 and no filename if it is an older GT.M release (with other required command line flags, as documented in the Administration and Operations Guide).
Start a Source Server on a root or propagating primary instance to replicate to this instance. Verify that updates on the source instance are successfully replicated to the receiver instance.
The -updateresync qualifier indicates that instead of negotiating a mutually agreed common starting point for synchronization the operator is guaranteeing the receiving instance has a valid state that matches the source instance currently or as some point in the past. Generally this means the receiving instance has just been updated with a backup copy from the source instance.
| Note |
|---|---|
A GT.M V5.5-000 instance can source a BC replication stream to or receive a BC replication stream from older GT.M releases, subject to limitations as discussed in the Limitations section of this document. It is only for SI replication that both source and recipient must both be V5.5-000. |
A supplementary instance cannot be the first or sole instance that you upgrade to V5.5-000 - you must already have created an instance running V5.5-000 to provide a replication stream to the supplementary instance.
You can create a supplementary instance from (a) a backup copy of another instance, a supplementary instance, an originating primary or replicating secondary by giving it a new identity, or (b) a freshly created, new instance. An instance used to create a supplementary instance must already be upgraded to V5.5-000.
Starting with a backup of another instance, follow the procedures above under Upgrade Replication Instance File using the -supplementary flag to the mupip replicate -instance_create command.
Creating a supplementary instance from a backup of an existing instance creates an SI replication instance with all the database state in the existing instance and is perhaps the most common application need. But there may be situations when a supplementary instance only needs new data, for example if it is to provide a reporting service only for new customers, and historical data for old customers is just excess baggage. In this case, you can also create a supplementary instance by creating a new instance, pre-loading it with any data required, enabling replication for the database files (since an Update Process will only apply updates to a replicated - and journaled - database region), and following the procedures above under above under Upgrade Replication Instance File using the -supplementary=on flag to the mupip replicate -instance_create command. Ship a replication instance file from the source to provide the -updateresync=filename qualifier required when starting the Receiver Server for the first time.
For starting SI replication on an originating primary supplementary instance P in a B<-A->P-<Q configuration, the procedure is similar to a non-supplementary instance except that one also needs to start a receiver server (after having started a source server to set up the journal pool) to receive updates from the corresponding non-supplementary instance (A or B in this case). Similarly, as part of shutting down the originating primary supplementary instance, an added step is to shut down the Receiver Server (if it is up and running) before shutting down the Source Server.
Remember that for GT.M replication, the Receiver Server listens at a TCP port and the Source Server connects to it. If the Receiver Server is not ahead of the Source Server, replication simply starts and streams updates from the source to the receiver. When the Receiver Server is ahead of the Source Server, the cases are different for BC and SI replication.
For either BC or SI replication, if the Receiver Server is started with the -autorollback qualifier, it performs an online rollback of the receiving instance, so that it is not ahead of the originating instance, creating an Unreplicated Transaction Log of any transactions that are rolled off the database. When started without the -autorollback qualifier, a Receiver Server notified by its Source Server of a rollback, logs the condition and exits so an operator can initiate appropriate steps.
For SI replication the -noresync qualifier tells the Receiver Server not to rollback the database even if the receiver is ahead of the source. In this case, the Source Server starts replication from the last journal sequence number common to the two instances.
When changing the source of a supplementary replication stream to another in the same family of instances (for example in the example where Ardmore and Malvern crash and Newtown is to receive a replication stream from BrynMawr, start the Receiver Server normally (with either -autorollback or -noresync, as appropriate) and allow BrynMawr to connect to it. Instead of using -autorollback, you can also perform a mupip journal -rollback -backward -fetchresync before starting the Receiver Server.
To migrate a supplementary instance from receiving SI replication from one set of BC instances to a completely different set - for example, if Malvern is to switch from receiving SI replication from the set of {Ardmore, BrynMawr} to a completely unrelated set of instances {Pottstown, Sanatoga}
GT.M stores trigger definitions in the regions to which they map and the maintenance-related information in the default region. To invoke a trigger on a global variable, GT.M uses the in-region information but for $ZTRIGGER() and MUPIP TRIGGER it searches the lookup information in the default region to find the region that holds its trigger definition.
Take this aspect into account while designing trigger maintenance actions and switchover processes for an LMS configuration having a mix of replicated and unreplicated regions.
You should exercise caution when you set up an LMS configuration where the default region is replicated but some regions that store trigger definitions are unreplicated. If the triggers in the unreplicated regions are needed for proper operation in the event of a switchover, you must define and maintain them seperately on the originating instance as well as on each replicating instance that may become an originating instance. To define or maintain triggers on a replicating instance, follow these steps:
Shutdown the Receiver Server of the replicating instance.
Apply the trigger definitions using MUPIP TRIGGER or $ZTRIGGER().
Set the sequence number of the default region to match the sequence number of the default region on the originating instance.
Restart the Receiver Server of the replicating instance.
Filters between the originating and replicating systems perform rolling upgrades that involve database schema changes. The filters manipulate the data under the different schemas when the software revision levels on the systems differ.
GT.M provides the ability to invoke a filter; however, an application developer must write the filters specifically as part of each application release upgrade when schema changes are involved.
Filters should reside on the upgraded system and use logical database updates to update the schema before applying those updates to the database. The filters must invoke the replication Source Server (new schema to old) or the database replication Receiver Server (old schema to new), depending on the system's status as either originatig or replicating. For more information on Filters, refer to “Filters”.
If you notice the replication WAS_ON state, correct the cause that made GT.M turn journaling off and then execute MUPIP SET -REPLICATION=ON.
To make storage space available, first consider moving unwanted non-journaled and temporary data. Then consider moving the journal files that predate the last backup. Moving the currently linked journal files is a very last resort because it disrupts the back links and a rollback or recover will not be able to get back past this discontinuity unless you are able to return them to their original location.
If the replication WAS_ON state occurs on the originating side:
If the Source Server does not reference any missing journal files, -REPLICATION=ON resumes replication with no downtime.
If the Source Server requires any missing journal file, it produces a REPLBRKNTRANS or NOPREVLINK error and shuts down. Note that you cannot rollback after journaling turned off because there is insufficient information to do such a rollback.
In this case, proceed as follows:
Take a backup (with MUPIP BACKUP -BKUPDBJNL=OFF -REPLINST=<bckup_inst>) of the originating instance.
Because journaling was turned off in the replication WAS_ON state, the originating instance cannot be rolled back to a state prior to the start of the backup. Therefore, cut the previous generation link of the journal files on the originating instance and turn replication back on. Both these operations can be accomplished with MUPIP SET -REPLICATION="ON".
Restore the replicating instance from the backup of the originating instance. Change the instance name of <bckup_inst> to the name of the replicating instance (with MUPIP REPLIC -EDITINST -NAME).
Turn on replication and journaling in the restored replicating instance. Specify the journal file pathname explicitly with MUPIP SET -JOURNAL=filename=<repinst_jnl_location> (as the backup database has the originating instance's journal file pathname).
Restart the Source Server process on the originating instance.
Start the Receiver Server (with no -UPDATERESYNC) the replicating instance.
If the replication WAS_ON state occurs on the receiving side:
Execute MUPIP SET -REPLICATION=ON to return to the replication ON state. This resumes normal replication on the receiver side. As an additional safety check, extract the journal records of updates that occurred during the replication WAS_ON state on the originating instance and randomly check whether those updates are present in the receiving instance.
If replication does not resume properly (due to errors in the Receiver Server or Update Process), proceed as follows:
Take a backup (with MUPIP BACKUP -BKUPDBJNL=OFF -REPLINST=<bckup_inst>) of the originating instance.
Restore the replicating instance from the backup of the originating instance. Change the instance name of <bckup_inst> to the name of the replicating instance (with MUPIP REPLIC -EDITINST -NAME).
Turn on replication and journaling in the restored replicating instance. Specify the journal file pathname explicitly with MUPIP SET -JOURNAL=filename=<repinst_jnl_location> (as the backup database has the originating instance's journal file pathname).
Restart the Source Server process on the originating instance. Normally, the Source Server might still be running on the originating side.
Start the Receiver Server (with no -UPDATERESYNC) the replicating instance.
To set up a new replicating instance of an originating instance for the first time or to replace a replicating instance if database and instance file get deleted, you need to create the replicating instance from a backup of the originating instance, or one of its replicating instances.
If you are running GT.M V5.5-000 or higher:
Take a backup of the database and the replication instance file of the originating instance together at the same time with BACKUP -REPLINSTANCE and transfer them to the location of the replicating instance. If the originator's replicating instance file was newly created, take its backup while the Source Server is running to ensure that the backup contains at least on history record.
Use MUPIP REPLICATE -EDITINST -NAME=<secondary-instname> to change the replicating instance's name.
Start the replicating instance without -udpateresync.
If you are running GT.M pre-V5.5-000:
Create a new replication instance file on the replicating instance.
Start the replicating instance with this new replication instance file with the -updateresync qualifier (no value specified).
In this case, it is possible that the replicating instance's database files are older than the originating instance. Note that to resume replication there is no need to transfer the backup of the originating instance's database and replication instance files.
To replace the existing replicating instance file with a new replication instance file, follow these steps:
If you are running GT.M V5.5-000 or higher:
Take a backup of just the replication instance file (no database files with BACKUP -REPLINST=</path/to/bkup-orig-repl-inst-file>) and transfer it to the site of the replicating instance.
Start the replicating instance with -updateresync=</path/to/bkup-orig-repl-inst-file>.
In this case, the Receiver Server determines the current instance's journal sequence number by taking a maximum of the Region Sequence Numbers in the database file headers on the replicating instance and uses use the input instance file to locate the history record corresponding to this journal sequence number, and exchanges this history information with the Source Server.
If you are running GT.M pre-V5.5-000:
Create a new replication instance file on the replicating instance.
Start the replicating instance with this new instance file with the -updateresync qualifier (no value specified).
On P:
Use the -SUPPLEMENTARY qualifier with the MUPIP REPLICATE -INSTANCE_CREATE command to indicate this is a supplementary instance file.
Start a Source Server on P with -UPDOK to indicate local updates are enabled on P.
Start the Receiver Server on P with the -UPDATERESYNC=</path/to/bkup-orig-repl-inst-file> qualifier and -RESUME. -RESUME indicates that A and P had been replicating before. The Receiver Server looks at the local (stream #0) sequence numbers in the database file headers on P and takes the maximum value to determine the journal sequence number of the new stream on P. It then uses this as the instance journal sequence number on A to resume replication.
On A:
Take a backup of the replication instance file and the database together at the same time with BACKUP -REPLINSTANCE and transfer it to P. If the A's replication instance file was also freshly created, then take the backup while the Source Server is running on the originating instance. This ensures that the backed up replication instance file contains at least one history record.
On P:
Create a new replication instance file. Use the -SUPPLEMENTARY qualifier with the MUPIP REPLICATE -INSTANCE_CREATE command to indicate this is a supplementary instance file.
Restore the database backups from A to P or use MUPIP LOAD to load the data.
Start a Source Server on P with -UPDOK to indicate local updates are enabled on P.
Start the Receiver Server on P with the -UPDATERESYNC=</path/to/bkup-orig-repl-inst-file> qualifier and -INITIALIZE. The -INITIALIZE indicates this is the first time A and P are replicating.
In this case, the Receiver Server uses the current journal sequence number in the </path/to/bkup-orig-repl-inst-file> as the point where A starts sending journal records. GT.M updates the stream sequence number of Stream # 1 in the instance file on P to reflect this value. From this point, GT.M maps the journal sequence number on A to a stream journal sequence number (for example, stream # 1) on P.
On P:
Turn off passive Source Server and Receiver Server (if they are active).
Turn off replication and run down the database.
On A:
Take a backup of the replication instance file and the database together with BACKUP -REPLINSTANCE and transfer it to P. If A's instance file was also freshly created, take the backup while the Source Server is running on the originating instance. This ensures that the backed up replication instance file contains at least one history record.
On P:
Do not create a new instance file. Continue using the existing instance file to preserve updates that have already occurred on P.
Start the Source Server with -UPDOK to indicate that local updates are enabled on P.
Start the Receiver Server with the -UPDATERESYNC=</path/to/bkup-orig-repl-inst-file> qualifier and -INITIALIZE. The -INITIALIZE indicates this is the first time A and P are replicating.
The Receiver Server uses the current journal sequence number in the </path/to/bkup-orig-repl-inst-file> as the point where A starts sending journal records. GT.M updates the stream sequence number (for example, of Stream # 1) in the instance file on P to reflect this value. Going forward, the journal sequence number on A will always map to a stream journal sequence number (for example, of stream # 1) on P.
Shut down the Receiver Server, passive Source Server, turn off replication, and rundown the database.
Open DSE and execute DUMP -FILEHEADER -ALL and note down the Region Seqno field of each replicated region(s). FIND -REGION="*" displays all regions and FIND -REGION=<region-name> switches between regions. Identify the highest Region Seqno of all the Region Seqnos. If you are running an A->P configuration, note down the Stream and Reg Seqno of all the streams.
Change the schema by modifying the global directory and relocating any data that needs to be moved.
Open DSE and run CHANGE -FILEHEADER -REG_SEQNO=<the-highest-region-seqno> to set the Region Seqno field in the database file header to the highest Region Seqno identified in step 2. If you are running an A->P configuration, run the CHANGE -FILEHEADER -STRM_NUM=1 -STRM_REG_SEQNO=<hexa> command to set the Stream and Reg Seqno of the streams noted in step 2.
Turn replication ON, start the passive Source Server, and start the Receiver Server without -UPDATERESYNC.
GT.M resumes receiving replication from the point of interruption.
When replication is ON, GT.M increments the Region Seqno field in the database file header for every update that occurs on a region. When replication is OFF, database updates do not affect the Region Seqno field. Except step 4, no other step affects the Region Seqno field. When you set the Region Seqno in step 4, you instruct GT.M to resume receiving replication from point replication turned off in step 1.
tlsrepl.tar.gz contains scripts that create two databases and sets up a secure (TLS/SSL) replication connection between them. Please click
to download tlsrepl.tar.gz and follow the below instructions. You can also download tlsrepl.tar.gz from http://tinco.pair.com/bhaskar/gtm/doc/books/ao/UNIX_manual/tlsrepl.tar.gz. The scripts in tlsrepl.tar.gz are solely for the purpose of explaining the general steps required to encrypt replication data in motion. You must understand, and appropriately adjust, the scripts before using them in a production environment. The following steps create two instances and a basic framework required for setting up a TLS replication connection between them. Note that all certificates created in this example are for the sake of explaining their roles in a TLS replication environment. For practical applications, use certificates signed by a CA whose authority matches your use of TLS.
On instance Helen:
Specify the value of $gtm_dist and $gtmroutines in the env script and execute the following command:
$ source ./env Helen
This creates a GT.M environment for replication instance name Helen. When prompted, enter a password for gtmtls_passwd_Helen.
Create a certificate directory setup in the current directory and a self-signed root certification authority.
$ ./cert_setup
This creates a self-signed root certification authority (ca.crt) in $PWD/certs/. ca.crt needs to be available on both Source and Receiver Servers. In a production environment, ensure that you keep root-level certificates in directories with 0500 permissions and the individual files with 0400 permissions so that unauthorized users cannot access them.
The output of this script is like the following"
Generating RSA private key, 512 bit long modulus
...........++++++++++++
...............++++++++++++
e is 65537 (0x10001)
Enter pass phrase for /home/jdoe/certs/ca.key:
Verifying - Enter pass phrase for /home/jdoe/certs/ca.key:
Enter pass phrase for /home/jdoe/certs/ca.key:
You are about to be asked to enter information that will be incorporated
into your certificate request.
What you are about to enter is what is called a Distinguished Name or a DN.
There are quite a few fields but you can leave some blank
For some fields there will be a default value,
If you enter '.', the field will be left blank.
Country Name (2 letter code) [US]:US
State or Province Name (full name) [Philadelphia]:Philadelphia
City (e.g., Malvern) [Malvern]:Malvern
Organization Name (eg, company) [FIS]:FIS
Organizational Unit Name (eg, section) [GT.M]:GT.M
Common Name (e.g. server FQDN or YOUR name) [localhost]:fis-gtm.com
Email Address (e.g. helen@gt.m) []:root@gt.m
Create the global directory and the database for instance Phil.
$ ./db_setup
This also creates a leaf-level certificate for Helen. The openssl.conf used to create this example in available in the download for your reference. Ensure that your openssl.cnf file is configured according to your environment and security requirements.
The output of this script is like the following:
Generating RSA private key, 512 bit long modulus
.++++++++++++
.......++++++++++++
e is 65537 (0x10001)
Enter pass phrase for /home/jdoe/certs/Helen.key: [Specify the password that you entered for gtmtls_passwd_Helen]
Verifying - Enter pass phrase for /home/jdoe/certs/Helen.key:
Enter pass phrase for /home/jdoe/certs/helen.key:
You are about to be asked to enter information that will be incorporated
into your certificate request.
What you are about to enter is what is called a Distinguished Name or a DN.
There are quite a few fields but you can leave some blank
For some fields there will be a default value,
If you enter '.', the field will be left blank.
Country Name (2 letter code) [US]:
State or Province Name (full name) [Philadelphia]:Illinois
City (e.g., Malvern) [Malvern]:Chicago
Organization Name (eg, company) [FIS]:FIS
Organizational Unit Name (eg, section) [GT.M]:GT.M
Common Name (e.g. server FQDN or YOUR name) [localhost]:fisglobal.com
Ename Address (e.g. helen@gt.m) []:helen@gt.m

Please enter the following 'extra' attributes
to be sent with your certificate request
A challenge password []:
An optional company name []:
Using configuration from /usr/lib/ssl/openssl.cnf
Enter pass phrase for ./certs/ca.key:
Check that the request matches the signature
Signature ok
Certificate Details:
 Serial Number: 14 (0xe)
 Validity
 Not Before: Jun 11 14:06:53 2014 GMT
 Not After : Jun 12 14:06:53 2014 GMT
 Subject:
 countryName = US
 stateOrProvinceName = Illinois
 organizationName = FIS
 organizationalUnitName = GT.M
 commonName = fisglobal.com
 emailAddress = helen@gt.m
 X509v3 extensions:
 X509v3 Basic Constraints:
 CA:FALSE
 Netscape Comment:
 OpenSSL Generated Certificate
 X509v3 Subject Key Identifier:
 96:FD:43:0D:0A:C1:AA:6A:BB:F3:F4:02:D6:1F:0A:49:48:F4:68:52
 X509v3 Authority Key Identifier:
 keyid:DA:78:3F:28:8F:BC:51:78:0C:5F:27:30:6C:C5:FE:B3:65:65:85:C9

Certificate is to be certified until Jun 12 14:06:53 2014 GMT (1 days)
Sign the certificate? [y/n]:y


1 out of 1 certificate requests certified, commit? [y/n]y
Write out database with 1 new entries
Data Base Updated
Create the $gtmcrypt_config file. Specify the names of all participating instances.
./gen_gc Helen Phil
Turn replication on and create the replication instance file:
$ ./repl_setup
Start the originating instance Helen:
$ ./originating_start Helen Phil
On instance Phil:
Specify the value of $gtm_dist and $gtmroutines in the env script and execute the following command:
$ source ./env Phil
This creates a GT.M environment for replication instance name Phil. When prompted, enter a password for gtmtls_passwd_Phil.
Create the global directory and the database for instance Phil.
$ ./db_setup
This also creates a leaf-level certificate for Phil. The openssl.conf used to create this example in available in the download for your reference. Ensure that your openssl.cnf file is configured according to your environment and security requirements.
Create the $gtmcrypt_config file. Specify the names of all participating instances.
./gen_gc Helen Phil
Ensure that ca.key generated on Instance Helen is available on instance Phil.
Create the $gtmcrypt_config file. Specify the names of all participating instances.
$ ./gen_gc Helen Phil
Turn replication on and create the replication instance file:
$ ./repl_setup
Start the replicating instance Phil.
$ ./replicating_start
For subsequent environment setup, use the following commands:
source ./env Phil or source ./env Helen
./replicating_start or ./originating_start Helen Phil
[4] The reason for the "almost completely" qualification is that the time to recover some older file systems can depend on the amount of space used.
